
Introduction
If you’re a gamer or work with graphic-intensive applications, you know how important it is to have a powerful graphics card in your laptop. However, over time, the graphics card in your laptop may become outdated or simply not capable of handling the latest games or software. In such cases, it can be beneficial to replace the graphics card with a more powerful one. In this article, we will guide you through the process of replacing a graphics card in a laptop.
Step 1: Check Compatibility
The first thing you need to do before replacing the graphics card is to check its compatibility with your laptop. Not all laptops support graphics card upgrades, so you need to make sure that your laptop has an available slot for the new graphics card. Additionally, you should also check if the power supply of your laptop can handle the power requirements of the new graphics card.
Step 2: Gather the Tools
Before you start the replacement process, gather all the necessary tools. You will likely need a screwdriver, thermal paste, and perhaps an antistatic wristband to protect the components from electrostatic discharge.
Step 3: Backup and Prepare
Before making any hardware changes, it is always a good idea to backup your important files. Although replacing a graphics card shouldn’t affect your data, accidents can happen. Once you have backed up your data, shut down your laptop and disconnect all the cables and the power source.
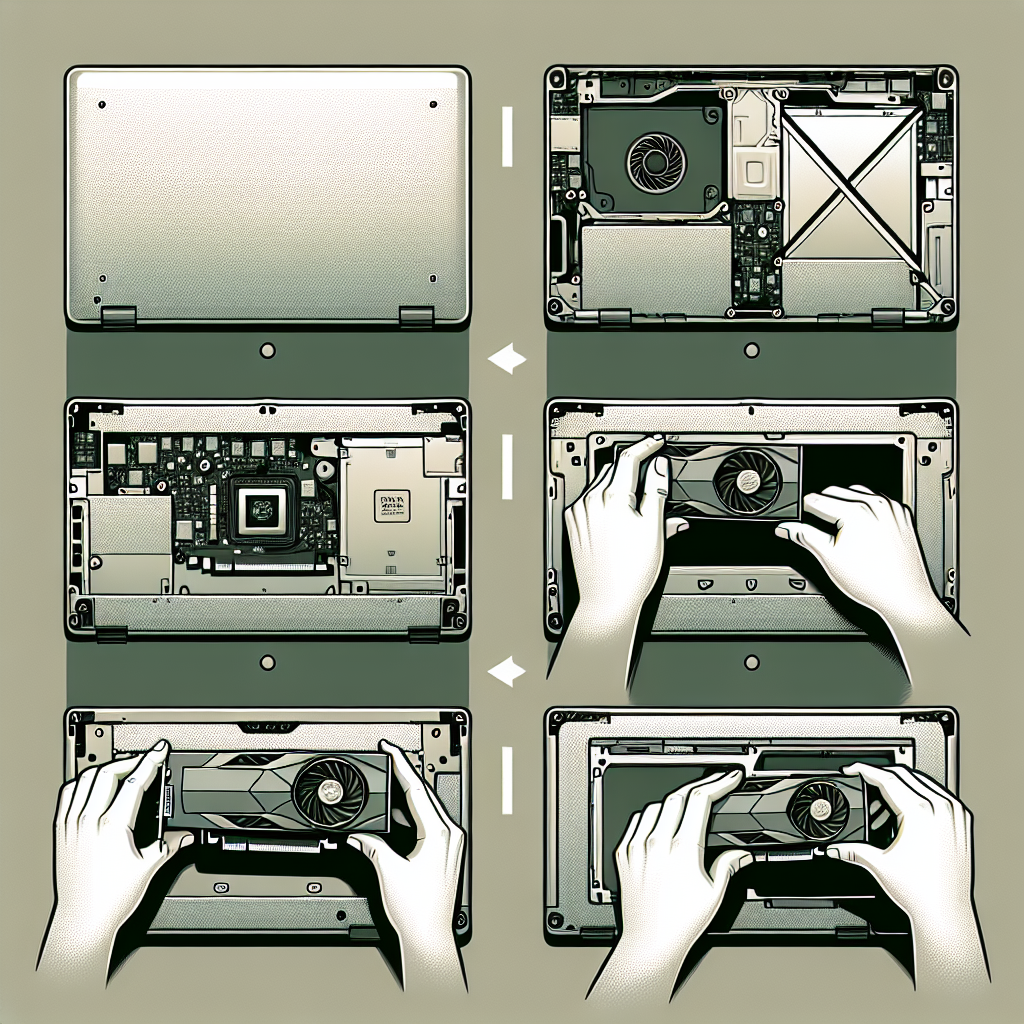
Step 4: Remove the Old Graphics Card
Open the laptop’s back panel or the part that covers the graphics card. You may need to refer to your laptop’s user manual or look for online tutorials specific to your laptop model. Locate the current graphics card and gently remove it by unscrewing any screws that hold it in place. Carefully disconnect any cables or connectors that are attached to the graphics card.
Step 5: Install the New Graphics Card
Place the new graphics card in the slot and ensure that it is properly aligned. Gently push it down until it is securely in place. Use the screws to secure the graphics card in place and reconnect any cables or connectors that were detached.
Step 6: Apply Thermal Paste
Thermal paste helps in conducting heat away from the graphics card. Apply a small amount of thermal paste on the GPU chip of the new graphics card. Make sure not to apply too much paste as it can cause overheating.
Step 7: Reassemble and Test
Put back the laptop’s back panel and secure it with screws. Reconnect all the cables and the power source. Now, turn on your laptop and check if the new graphics card is detected. Install the necessary drivers for the new graphics card and run a few tests to ensure that it is functioning properly.
Conclusion
Replacing the graphics card in a laptop can be a great way to boost its performance and enjoy a better gaming or graphic design experience. However, it is essential to ensure compatibility, gather the necessary tools, and follow the steps carefully to avoid any damage to your laptop. If you’re not comfortable performing the replacement yourself, it’s best to seek professional assistance. With a new graphics card, your laptop will be ready to handle the latest games and software with ease.
No Responses